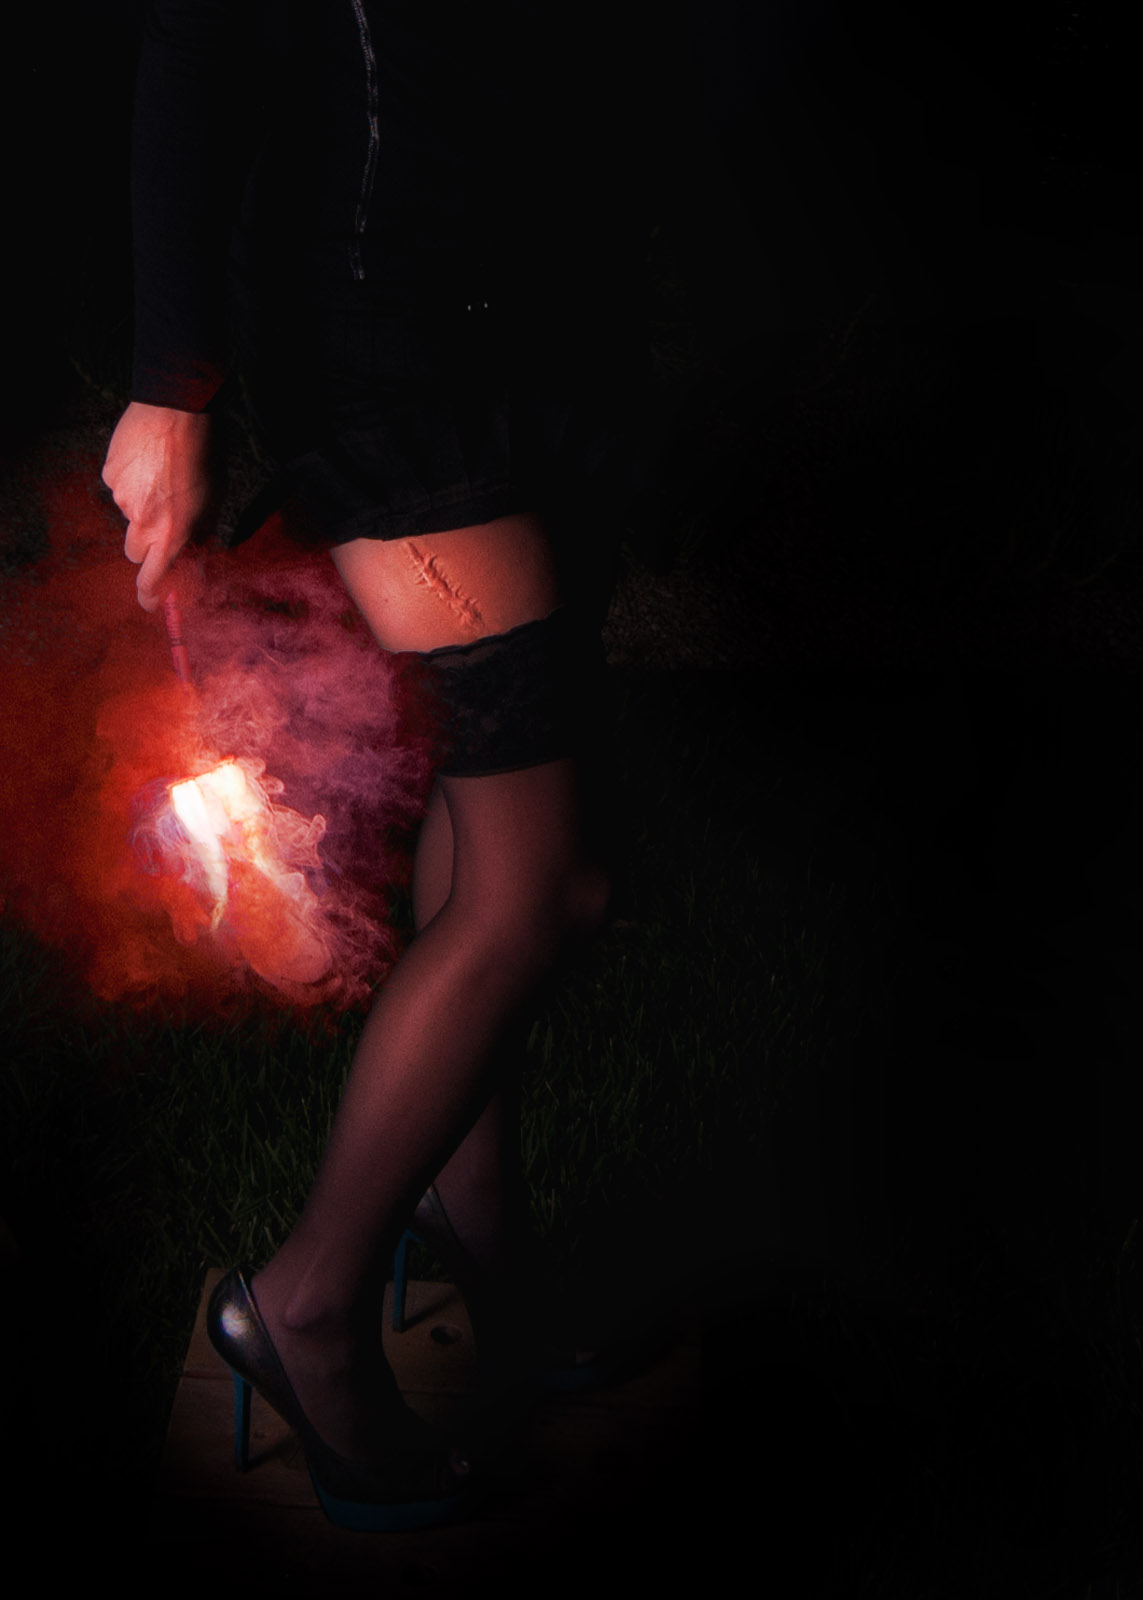
For the final part of this tutorial series, we turn to the sexy but scarred leg of my filthy assistant (look it up) being lit by a road flare. You’ve obviously seen the video, the tutorial on fire breathing and the one on hairspray burning. This is the end of the road, I’m not going to bother with the wool spinning just yet, and the EL wire has already been covered elsewhere.
This is the image we’re going to create

I’ve shown you some interesting stuff to do with fire that has, lets face it, all been very very safe unless you’re a raving idiot with the IQ of a 2 year old and the common sense of that chicken that likes wandering across the road. This time it’s different.

Flares are dangerous. My local hardware store sells them for $2 and every time I shop they point out to me that I really shouldn’t be buying quite so many. I think the FBI might be watching me – not really; I’m worthy of the NSA at least. Back to flares, the instructions are very simple, you strike them like match, they take 1 maybe 2 seconds to really flare and then you’re supposed to drop them on the road. The instructions say hold for 5 seconds to ensure they’re burning but absolutely no longer than 10. I’ve timed it, you can safely hold them for 20. At this point they start getting a little hot and lumps of flaming magma spew randomly from the tips. At 25 seconds you’re insane if you’re still holding one. At 30, you’re heading for hospital.
The idea for this photo came about because my model sometimes gets a little too brave. When creating the below image she held the flares for 25 seconds and actually does have two tiny scars on her leg.
You have been warned!!!
Also, if you’re married to a model that has just permanently scarred her beautiful leg while helping you make an average picture, buy her a car or something. Don’t under any circumstances shrug the whole thing off as a silly mistake. I’m just sayin’.
Thankfully the scar is tiny and not very photo worthy, so we decided to exaggerate a little using standard theatrical makeup. It was our first time playing with this sort of thing and so the results needed a little Photoshop to make them look convincing.
Here’s the set up. I was stood nice and high looking down on the scarred leg, there was a small gridded speedlight looking up and we took the now customary multi-exposure shots. The flare needed 1/500th of a second in my opinion, but now I’ve seen the results, I think I should have gone for 1/1000th. Experiment yourself and let me know.

This is the before shot of the fake scar. As you can see, no matter how much effort and makeup we put on it, it’s clearly still a stuck-on fake thing. Apparently, you can use liquid latex to make them look more real but the lady in the shop didn’t know what she was doing, so the blind led the blind, and I didn’t get the tools I needed.
No worries though, using the Photoshop Healing Brush Tool this sort of thing takes mere seconds to fix. Having selected the tool, move the cursor to the flesh near the scar, hold the Option key and click. This samples the colours and tones you want to paint with. You then simply drag the mouse over the edge of the fake scar and it magically disappears. Amazing stuff.

Here’s my full processing of the two shots – working from the bottom up.
First, duplicate the layer with the leg. We’re going to have to damage the pixels on this image so we want a backup.
On the cloned layer use the Healing Brush Tool as I just described to make the scar look realistic. Once complete, you can now perform all work on this new layer, but for reasons I can’t recall, I duplicated it, renamed it Glamour Glow and performed the work on this new version.
Regardless of what layering option you choose, you’ll need to make it a Smart Filter. We’re going to take out a little of the realism, and add in a little softness. To do this, add a Gaussian blur of about 10 pixels. Then adjust the layer blending mode to be Soft Light. The image still didn’t look quite right to me, so I added a levels layer to adjust the brightness, and a color balance to increase the reds.
Think about this for a second. We took two pictures, one with a white flash, the other with a bright orange flare in it. To look like the same picture we either have to remove the orange cast from the flare, or add it to the leg. The other option, of course, would have been to gel the flash properly. A color balance layer allows us to add the orange with just a few clicks.
Now we need to bring in the flare photo as it’s own layer. Set the blend mode to be Lighten. As you can see from the mask layer below, there was some nasty cast in the image that I didn’t want so I hid it using a graduated fill.
And then finally, add a new layer, set the blend mode to Overlay, fill it with 50% neutral color and use this layer for your dodge and burn tool to hide the grass, and most of the silly wooden plank she had to stand on because her heels we’re sinking in to the grass.

That’s the end of this session. Three tutorials for the price of one. Go back and watch the 90 second video that started it all, and then get out there and burn something!
Come on, talk to us!