 Having seen my new LinkedIn picture, my beautiful wife wanted one of her own. Of course, she didn’t want the ‘aged’ version I did for myself (see here) but something a little more realistic. Pictures of her wouldn’t usually be the subject of a tutorial because she’s blessed with a radiant smile, sparkling eyes and soft unblemished skin – there’s really nothing for me to ‘fix’ in Photoshop.
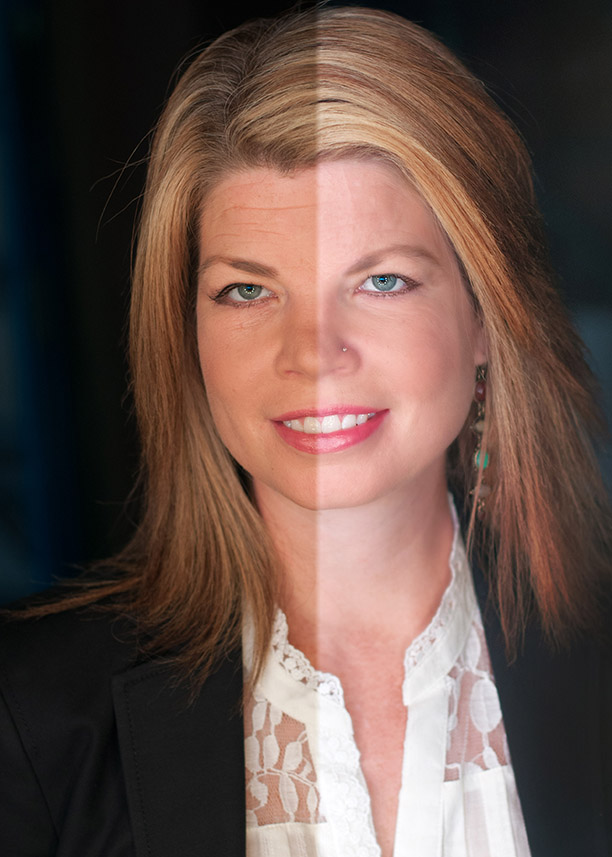
However, I used my now legendary trademarked and patented hula-hoop light ring for the photo, and while it gives very even light, it is exceptionally harsh, adding lines and marks where nature normally fears to tread. For this reason, and this reason alone, here I present a brief tutorial on softening and smoothing skin, sharpening eyes, whitening teeth and adding luster to hair.
I’ll do all this in my usual broad-brush fast style. There are hundreds of ways of achieving the effects you see above but most of them require careful intricate work and I’ve no patience for those old-skool ways.

Here’s our starting picture. As you can see the lighting is terrible, making her face appear lined and the color is way too warm.

The color we fix in Adobe Camera Raw. See that little white balance eye dropper on the top toolbar? Take that and click somewhere grey-ish. I used the whites of her eyes and then manually moved the sliders until I got the color I wanted. Now press Open and we’re in Photoshop real.

The way this fast process works, is that we’re going to duplicate the starting layer, work on that for a while and then change the blend modes to apply the effect. All this should be familiar to you by now, but I’ll explain again as needed. Hit Command+J to duplicate the layer. Double click the words “layer 1” and rename it as sharpening.

With the new layer selected, go to the Filter menu and under ‘other’ there’s an option called High Pass Filter. This filter sharpens an image by looking for lines of contrast, such as the ones on the face that we want to remove. This is counter intuitive but we’re going to use this filter to exaggerate the lines as a way of getting rid of them. Set the filter to a radius somewhere between 6 and 12. I selected 7 just because. With more time I could tell you how to find exactly the right number, but that’s more of that old-skool fussing. When you hit OK the image will go grey and you’ve effectively created a contrast mask for your image.

If the high pass filter finds all the lines, and we don’t want to do that, how could we quickly find all the other areas? How about we just invert the entire layer! And that’s the genius move right there. Hit Command+I and you’ve just turned an High Pass Filter into a Low Pass Filter. Freakin’ genius.

When you look at your image now you’ll see that everything has a lovely smooth softness to it, and while that is great for skin, it’s pretty terrible for everything else in the photo. The easiest way to fix that is with a mask. Press the icon at the base of the layer pallet to add a mask and then using a 50% soft brush paint roughly in the areas you don’t want the effect added. Don’t forget to do the eyes and mouth (and in the case of D, I also did her nose ring). When painting with masks, it’s always wise to occasionally hold the Option key and click on the mask icon. This reveals the mask (above) so you can see how you’re doing. In the above image I’ve clearly missed a little of the right eye and whole row of teeth. This part you’re doing now is the shortcut. No fancy selections, blends, or painting, just a medium soft brush quickly describing the facial area.

One more clever bit, rather than use this new soft skin as is, we’re going to blend it with the layer below. If you don’t do this, your model will look overly airbrushed. The aim here is not to create an image that is plastic and perfect, but to just soften what are naturally occurring beauty lines. On the layers palette, drop down the blend mode menu and change it to Overlay. While you’re there, lower the Opacity of the layer to about 30%. At 30% you’ll see all those natural lines showing through the smooth skin we just made, giving your image that ‘real’ look we want.

Compare your image with where you started and she’s already beginning to look much better.

Now for the the hair, lips and eyes. Again, we’re going to use some great shortcuts to naturally saturate these features. We need another copy of the image for this to work. You can either flatten your image and do the Command+J thing again, or you can use the secret undocumented Stamp command (shh tell no one). Stamp can only be activated by Shift+Option+Command+E. Rename this new layer as “hair lips eyes”, and once again change the blend mode to Overlay. You’ll see immediately that your image has lots more color and warmth – probably too much. So, lower the opacity to a level that you like. I used 30% again.
Just like when we softened the image and only wanted it to apply to the skin we added a mask, we only want this new layer to apply to the ‘non-skin’ areas. So, again we add a mask.

There’s a couple of things to note this time. Firstly, hair is fine and so you need very soft edges to your painting. you can achieve this by setting your brush to 0% hardness (drop down at the top left corner of your screen). In my wife’s photo, her hair was over her jacket and I didn’t want to saturate that, so while most of her hair is painted with 100% brush opacity, for this area I lowered it to 40%. You can see the difference in the grey / white shading above. The effect we’re creating was also too harsh on the eye’s so, again, I adjusted the brush opacity. I used 50% when painting the eyes. This is a trial and error process but is a damn sight faster than trying to use the numerous selection tools to capture ever stray hair and wispy curl.
In the previous step we set the layer’s blend mode 30%, you may find it easier to set it to 100% occasionally to gauge the effect of your handy-work.

Just for giggles, this is my image when set to 100% layer opacity.

We are almost done. There’s some bulb flare on the right of the jacket that’s off-putting, and the background could be a tad less distracting. The fastest way to get rid of those two annoyances is with a dodge and burn layer. You could just use the tools directly on the image, but I prefer to create a new layer and use that instead. The New Layer dialog menu option is at the top right of the layers palette that looks like a down arrow.

Fill out the dialog exactly as shown above and it wil create you a completely invisible grey layer. Anything you paint on this layer that is darker than grey will make the image darker, and anythng you paint lighter, will make the image lighter.

Rather than actually paint dark colors on this layer, I used the Burn brush to incrementally darken the grey invisible paint – I’d suggest you do the same. Set it to mid-tones, 50% hardness, 35% opacity and just paint around the bits you don’t want. I also painted over bits of her black jacket to give it lift.

One final step and we’re done. There’s still a few areas of her face that I think I could fix, so use the Stamp tool (Shift+Option+Command+E) one more time to make a new layer. This is the ‘blemishes’ layer. You’re going to select the Spot Healing Brush, set it somewhat small and just paint over the lines you don’t want. For effect only, I’ve scribbled over D’s face. Once you stop drawing (which can just be a single click to remove a zit or mole), the software automatically tries to recreate the area you painted using the skin tones around it. Most times it gets it right, sometimes it doesn’t. Just keep painting until you’re happy.

Again, we’re not going for plastic smoothness here, so let some of the original features show through but lowering the layer opacity to about 40%. A little cropping and we’re done. Beautiful, but not Photoshopped fake beautiful.
And we did it fast too. What was that? 15 mins and 7 steps? I’ve seen 4 disk DVD’s that create the same image over a 2 day period. Old-skool nincompoops.
Come on, talk to us!