We spent the weekend in Paso Robles, deep in the heart of the ‘other’ grape growing place in California. In addition to all the fine wines, there’s art everywhere, some of it even quite nice. The pictures that captured our attention was a series of paintings that depicted landscapes as viewed through thick fog. We can do that we said. And this tutorial was born.
Rather just taking pictures of trees though, we thought fog equals water, water is rivers, and so we need to take pictures of rivers. A fine morning was spend calf deep in freezing water snapping long exposure waterfalls with a group of similarly inclined snappers.
In order to take long exposures during daylight, you’re going to need a Neutral Density filter. An ND is basically sunglasses for your camera. You pop them on and everything goes dark. Mostly they come in shades of black that reduces the light by 2, 4, 6 or 8 stops. Ours a little more complex than that. We have the H&Y Adjustable ND filter that allows us to dial in the amount of darkness required. This filter has its drawbacks: you can’t use it for fine work as it makes everything a little soft and messes with the color a tad. However, for the sort of pictures we take, it’s perfect. For those of you with money to burn, the state of the art is called a Singh-Ray, it has none of the limitations – it’s very very good.
Most people never shoot long exposure, and consequently there’s a few things about their expensive DSLRs that they simply don’t know. Do you know how to check if yours is taking a picture? Standing in the river, the chatter of photographers, the roar of the water, the wind in the trees, the occasional airplane buzzing over, it’s hard to hear all the clicks and beeps that cameras make to reassure you they’re working as needed. So how do you know that it’s in the middle of a 20 second exposure?
Tip 1: Glance through the viewfinder and if all you see is blackness then either you’ve left the lens cap on or your camera is exposing a shot.
Most DSLRs these days have a ‘live view’ mode that allows you to compose and focus using the big screen on the back rather than the view finder. Ask around your Pro friends and they’ll all tell you that it’s a terrible way to take a picture, and that they never use it. They’re wrong.
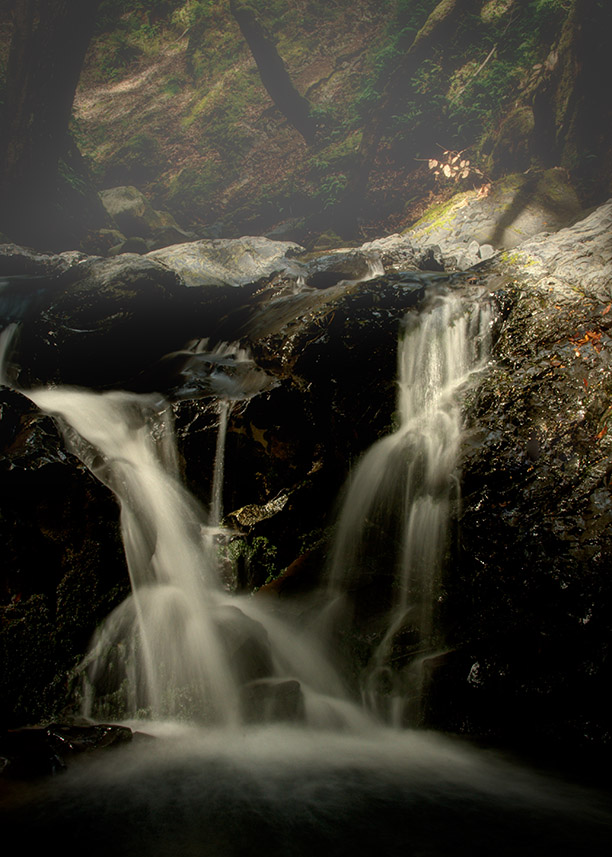
When taking nature photographs the foreground is almost always the most important part of the picture, and getting your camera as close to the action as possible is key. For most images that means getting your camera really low to the ground. The three images on this page were all shot with the camera less than 4 inches from the surface of the water. We’re getting old and less flexible. A morning spent doubled over trying to peer in to a little window hovering inches off the ground seems like a terrible start to the day.
Tip 2: Use the ‘live view’ mode to compose pictures when you can’t easily get your eye to the view finder.
Which brings us slightly off topic but on to a subject very close to our hearts.
Tip 3: Please wear trousers that pull up to at least you nipples, or a shirt that comes down to your knees if you intend to spend the day bent over a tripod like a plumber under a sink. We came to see the crack of dawn, not the crack of… Well you know where we’re going with this.
The 3 photos you see here are all taken at somewhere between 11mm an 16mm, ISO 200, F22 for either 25 or 30 seconds in manual mode. When taking pictures like this, light pollution often wanders in to the frame from strange places. One of the downsides of using ND filters is that lens hoods can rarely be used with them. So you’re going to need another way of stopping sunlight creating flares on your lens.
Tip 4: Shield the front of your lens using a baseball cap, a sheet of paper or even a large leaf to reduce sun flare.
Now that you’ve captured your images, you need to process them. We’re going to try to do as much as possible in Adobe Camera Raw (ACR) rather than Photoshop – just because we can. (The fog will still be needed to be added in PS.)
Here’s the straight from camera image on the left, and the fully processed image on the right.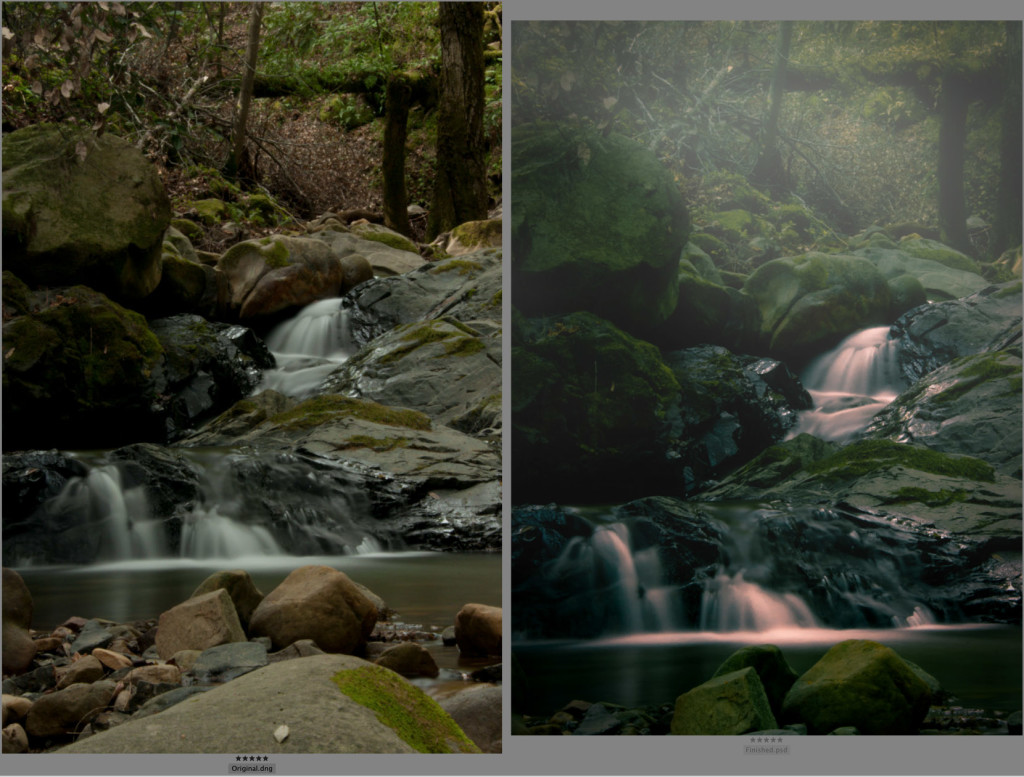
Let the tutorial commence!
Step 1.
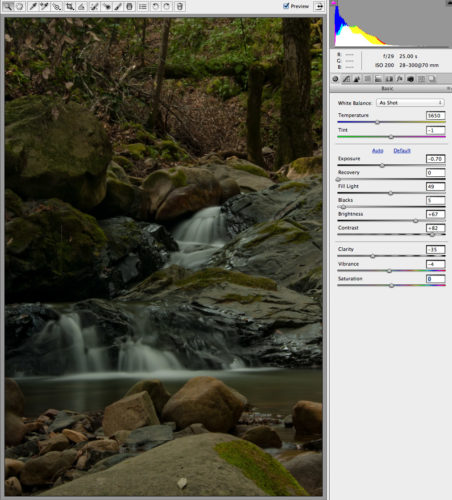 Using the Basic panel in Adobe Camera Raw, we lowered the exposure slightly to make the picture more moody. We then pushed the fill light up a tad to make the water glow. We adjusted the brightness and contrast to give the image more punch. And finally, we removed a little of the color using Vibrance, and softened the image to prepare it for the fog using the Clarity setting.
Step 2.
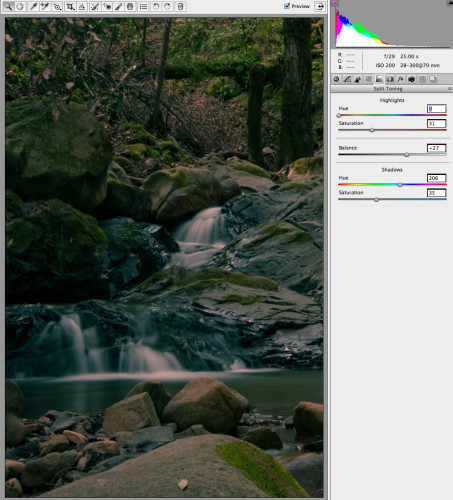
Split Toning is the art of changing one set of colors for another. In Photoshop you can do DuoTone (2 colors), TriTone (3), and many more. It’s all very clever and gives your images an other-worldly look. In ACR we can only do DuoTone. We get to re-map the highlights and the lowlights. The highlights in this image are clearly the white water. To give them more interest we mapped them to red. The lowlights are the dark shadows, because this is a forest, we mapped them to green/blue.
Step 3.
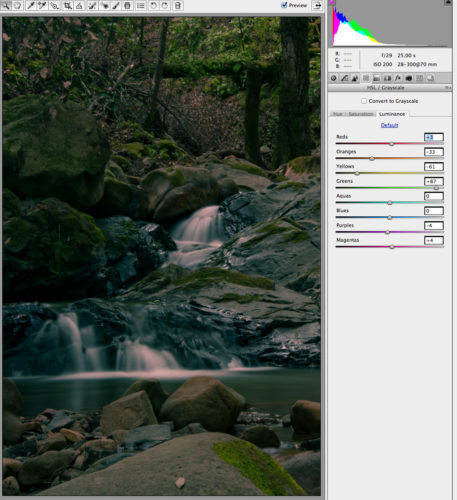 Now we get to play with the specific colors, their saturation and brightness. We start on the right with Luminance. We took a lot of light out of the picture by killing the Oranges and Yellows and over brightening the Green.
Step 4.
 Having gone to the trouble of killing the Oranges and Yellows we then put them back by boasting their saturation. The effect of doing this is very subtle but it adds a depth (contrast) to the rocks and forest that’s hard to explain.
Step 5.
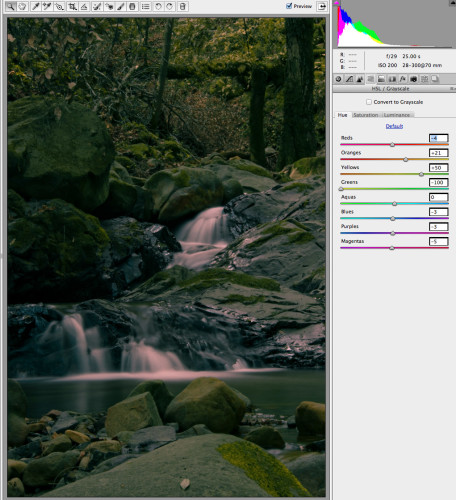 The final touch on the color mapping is to take those boosted Oranges and make them yellowish, and to push the Yellows to green. As a finally touch, we pushed all the Greens to yellow. The overall effect of these HSL changes is that no color is where it started. Everything in the image has been altered but in such as way as you could believe it’s natural.
Step 6.
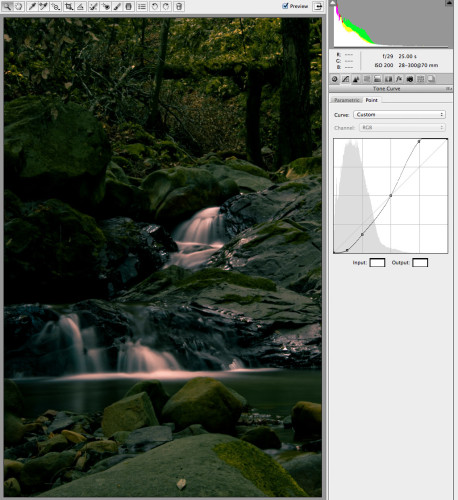
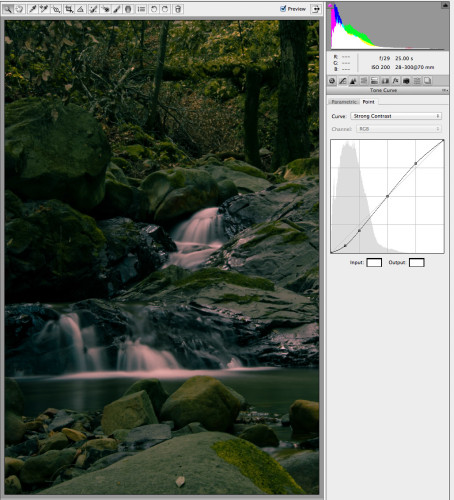 Let’s add even more contrast. On the Tones Curve panel select Strong Contrast. You’ll see immediately that the image becomes much more intense.
Step 7.
Let’s take that intensity and push it even further. Click on the dots on the curve and move them up or down until you get a look you like. We made the shadows darker, and clipped the highlights.
That’s the end of phase 2 (assuming P1 was taking the actual image). We now have a long expose forest / river shot that looks pretty damn fine and we’ve not been anywhere near Photoshop!
Let’s add some fog and we’re done. Unfortunately, we can think of no way of doing this in ACR, so it’s off to the big bad Photoshop for us.
Step 8.
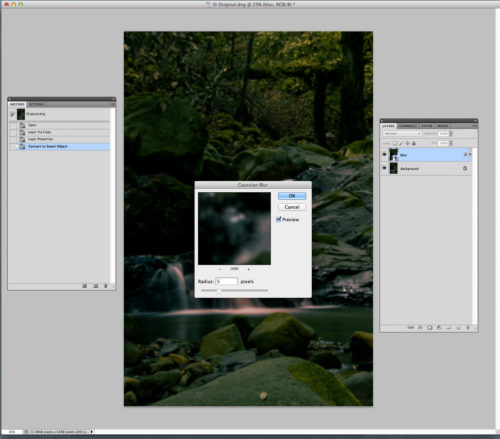 Once your images is loaded in to Photoshop press Command+J to ‘juplicate’ the layer. This should have no visible effect on your image. Fog has two effects on the eye. It makes everything brighter (which is why we darkened the image), and it makes everything look slightly blurred. We’re going to do the blur first. Using the Filter menu, select Convert For Smart Filters (this is always the best way to use filters). Now select Filters, Blur, Gaussian. We want the forest to only be slightly out of focus so pick a small number. We chose 5 but on reflection 3 might have been better.
Step 9.
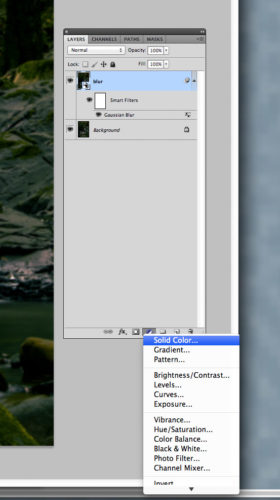 Now we need to add all that water vapor. To do this we need to add a new layer using the little yin/yang button at the bottom of the layers palate. Select Solid Color and when the color picker appears choose the whitest white there is.
Step 10.
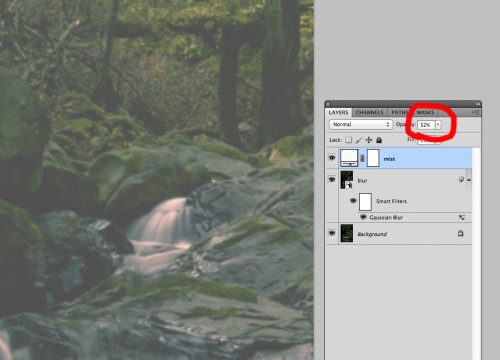 Your whole image went white and you freaked out, right? Don’t worry, we can fix that. Again on the Layers pallet, alter the Opacity of the white layer. This is basically making the solid white transparent. Set it to zero and it becomes invisible. Set to 100 and it’s all you can see. Set is somewhere in the 30’s and it becomes a gentle mist through which you can view your forest.
Step 11.
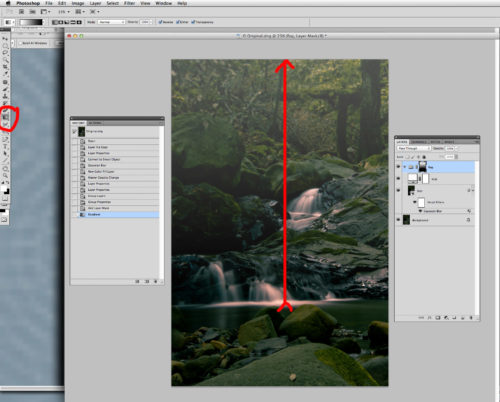 Time to make the mist and the blur in to believable fog. As you know you can see your feet clearly even in thick fog, but objects that are far away are obscured. We can do that easily with a Gradient Mask. Click on both the blur and the mist layers and while holding down the shift key, click Command+G. This will make a new folder (I called mine fog) that contains both the layers. Now click the mask button on at the bottom of the Layers pallet. By placing a mask on the folder, all the changes you make will apply equally to the blur and the mist. Perfect.
Over on your tools pallet select the gradient fill tool. Hit ‘D’ on your keyboard. You just set the default colors to be Black and White. Now, draw a line on your image where you want the fog to start and where you want it to end. In our case, we wanted fog from the water line to the top of the image. See how everything at the bottom of the image suddenly slammed in to focus and then gradually faded away as it rose up the image? Just like real life.
Step 12.
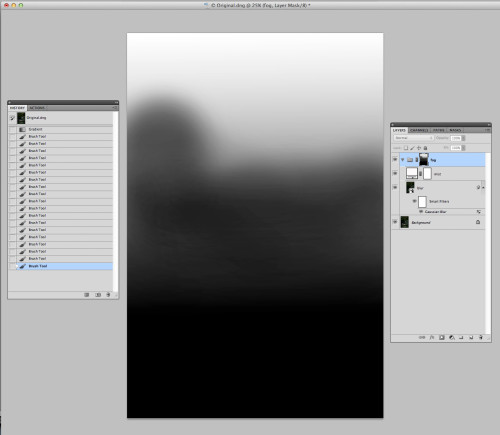 Well, almost like real life. Those rocks above the river need less fog. Select the Brush tool from your palate and set to 0% hardness and 10% opacity. The latter can be done just by pressing 1 on your keypad. Make the brush nice and large by pressing ‘]’ (or ‘[‘ if you go too big), this helps exaggerate the softness. Now paint over everything that needs less fog. If you want to add more fog, hit ‘X’ to swap the paint color from black to white and paint again. If you wish to see the mask you’ve created you can click on the mask in the layers pallet while holding down the Option key. (Shown above). If you want to disable the mask to better see the effect, Shift+Click the icon.
Step 12b.
If you need to crop (we did), now is the time.
Step 13.
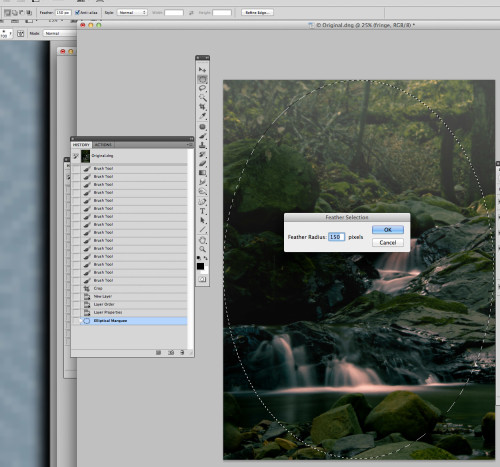 Next we’re going to add a little fringing to really draw the eye to the heart of the image. Select the Elliptical Marquee tool and set the feathering to 150. Now drag an oval from the top left of your image to the bottom right. 150 is not really enough feathering for our needs (it’s a PS 3 limitation, that was raised to 250 in PS 4 – I think). Under the Select menu, choose Modify, Feather and give it another 150 pixels. Now choose Select, Inverse.
Step 14.
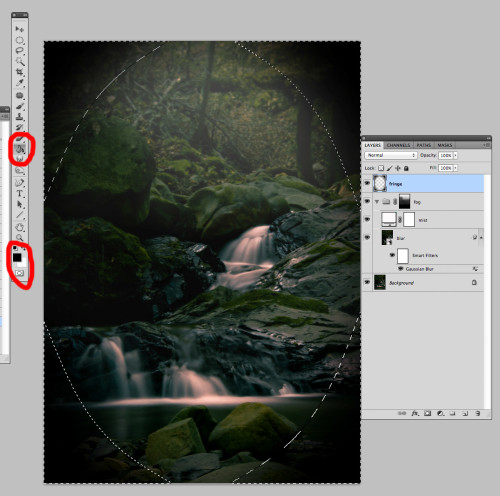 Press and hold your Gradient Fill tool and it will turn in to a menu allowing you to select Paint Fill. Make sure black is your default color and fill the corners of your image. One click should do it all. Press Command+D to get rid of the ants.
Step 15.
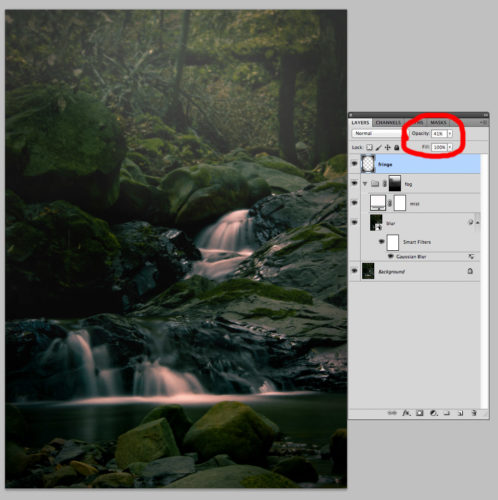 Just like when we made the mist more transparent, we’re going to make the fringing more subtle. Lower the layer opacity to about 40%. If this is still too harsh for you, try blurring the layer a little, maybe 50 pixels or so.
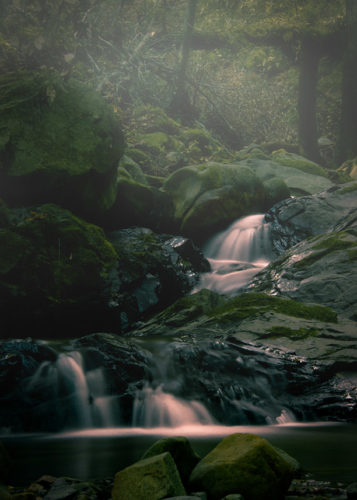
And we are done. Milky water, subtle fog, and dark dank forest greens. Simple.
We thank you.
Bonus Tip: when standing in a river it might seem like a good idea to use your iPhone to snap a picture of you snapping pictures. It isn’t. These 3 photos cost us $700 in phone replacement fees 🙁
Come on, talk to us!